- Introduction
- Include employees in Easystub
- Add individual employees to Easystub
- Print employee instructions
- Log into Easystub
- User agreement
- Reset your username and password
- Enter company information
- Create an Easystub pay stub file
- Upload an Easystub file
- Easystub menu options
- Easystub T4 slips New
Introduction
Before using this guide, you will need to have an Easystub account registered with Easypay. If you would like to sign-up for Easystub, please call the Easypay sales line at 1-800-270-0075. When you open an Easystub account, you will be given an Easystub Company ID and instructions on how to activate the Easystub feature in Easypay Payroll.
Once the Easystub feature is activated in your Easypay system, you can use this guide to complete the set-up process. This guide also describes how to log into your Easystub account and upload your first pay stub file to the Easystub website.
Please note: The Easystub options in Easypay Payroll that are mentioned in this guide are not accessible until the Easystub feature has been activated in Easypay.
Include employees in Easystub
After turning on the Easystub feature in Easypay, you will need to indicate which employees will be participating in Easystub. This is done by turning on the Easystub option in the employees' profiles. The quickest way to do this is by using the Employee Update Utility.
- From the Easypay menu, go to Edit > Employee > Update Utility.
- Set the Item to be updated to "Easystub".
- Turn on the Include employee in Easystub checkbox.

- Click the Next button at the bottom of the window.
- After you click Next, a window will be displayed showing you the changes that will be made.
The New column will show that the Easystub option will be turned on for all employees.
If there are any employees that you don’t want included in Easystub, turn off the New checkbox for those employees.

- When you are ready to update the employee file with these changes, click Save Changes to File.
The selected employees will now have the Easystub option turned on in their employee profile and will receive their pay stubs via Easystub.
Add individual employees to Easystub
In addition to using the Employee Update Utility to turn on the Easystub option for an employee, you can turn on this option in the Banks tab of their Employee Profile:
- From the Easypay menu, select Edit > Employee > Profile.
- Click the Banks tab.
- Turn on the Include employee in Easystub checkbox.
- Click Apply or OK.
Please note: Employees must have a valid SIN number before the Easystub option can be turned on in their Employee Profile. (The temporary SIN number 999-999-998 is not considered a valid SIN number.)

Print employee instructions
After you have uploaded the first Easystub file for your company, you will need to give your employees instructions on how to access their pay stubs and T4 slips on the Easystub website.
In Easypay, select Reports > Print Employees > Easystub Instructions.
This report allows you to print one page of instructions that is customized for each employee. It provides an introduction to Easystub and instructions on how to log into Easystub.
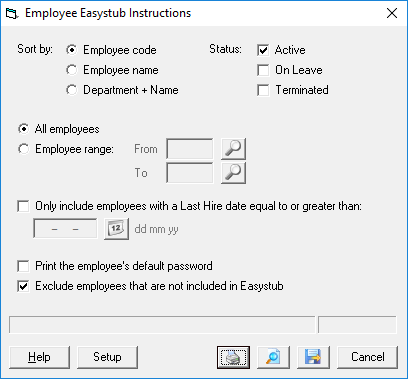
An employee’s initial password is the last five digits of their SIN number. By default, passwords are not printed on this report. If you prefer to have the passwords printed, turn on the Print the employee’s default password option.
Please note: Your employees will not be able to log into their accounts until after their first pay stub or T4 slip is posted to their account. We recommend that you wait until after the first Easystub file has been uploaded before giving your employees instructions for accessing Easystub.
Log into Easystub
The ![]() icon in the menu bar at the top of the Easypay window is a shortcut to the Easystub Upload File window.
icon in the menu bar at the top of the Easypay window is a shortcut to the Easystub Upload File window.

You can also access the Easystub Upload File window by selecting Payroll > Cheques/Deposit > Easystub Upload.
Click the ![]() icon to open the Easystub Upload File window.
icon to open the Easystub Upload File window.

The Easystub Upload File window displays the most recent Easystub pay stub file that was created in Easypay. If an Easystub pay stub file has not yet been created, a message will be displayed that says “Easystub file not found…”.
Click the Go to Easystub Log-in button. This button will open the Easystub Company Login page in your web browser.
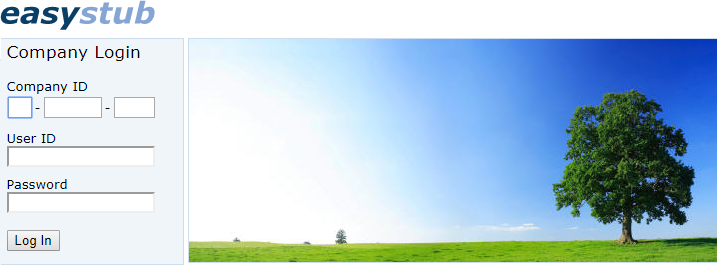
Enter your Easystub Company ID into the Company ID field. This is the ID number that was given to you during the Easystub registration process.
The first time that you log in, the User ID and Password are equal to the Company ID without the dashes.
- For example, Company ID E-000001-0007 would be entered as E0000010007 in the User ID and Password fields.
The easiest way to do this is to type in the User ID and then copy and paste it into the Password field. If you are not comfortable with copy and paste, then type the Company ID into both the User ID and the Password fields, without the dashes.

User agreement
After you have successfully logged in with the default User ID and Password, you will be asked to read and accept the User Agreement. It is important that you read and understand this agreement before accepting its terms.
Reset your username and password
After you have accepted the user agreement, the Change Password / User ID page will be displayed. A message will be displayed asking you to enter a new Username and Password.

Please note:
- User ID and Password are case sensitive.
- User ID and Password must be at least 5 characters long.
- Choose a password that is difficult to guess by using a combination of case-sensitive letters and numbers.
- Enter a new ID in the New User ID field and click the Save User ID button.
- Enter a new password in the New Password field and also in the Re-enter Password field. Then click the Save Password button.
- Log out and then log back in using your new User ID and Password. If you have any problems logging in, please call Easypay Support at (905) 825-8020 for assistance.
Enter company information
After you have logged into Easystub, select Edit Company from the menu on the left side of the page.
Please make sure that your company information is complete, especially your contact name, phone and email address.
If you have more than one Easystub company, we recommend that you enter a Company Reference for each company to help identify your different companies.
For more details about the Edit Company page, please refer to the on-line help by clicking Help at the top right of the Easystub page.
Create an Easystub pay stub file
An Easystub pay stub file is created when you create your direct deposit file.
- When you are ready to create your direct deposit file, go to the Create Direct Deposit File window and enter the information on the Direct Deposit tab as you normally do.
- Click the Easystub tab or Next button.
- On the Easystub tab:
- Enter a Pay Period Description (optional).
- Enter the File Creation Date (the current date).
- Select the optional items to be included on the Easystub stubs.
- The File Creation Number is automatically filled in and does not usually need to be edited. This number must be unique for each Easystub file that is uploaded for a given company.
- Click OK. The direct deposit file and the Easystub file will be created.

Upload an Easystub file
- Click the
 icon in the Easypay menu bar to open the Easystub Upload File window.
The details of the current Easystub file will be displayed: - Select the type of file that you want to upload:
- Regular pay stubs
- Quick pay stubs
- T4 slips
- Click the Copy Easystub File Path button. This will copy the Easystub file path to your computer’s clipboard.
- Click the Go to Easystub Log-in button. This will open the Easystub Company Login page in your web browser.
- Log into your Easystub account. After you log in, the Upload File page will be displayed:
- Click the Choose File button beside the Easystub XML File field. This will open a File Upload window.
- In the File Upload window, you have two options: You can either paste the file path into the File name field, or manually select the file from the correct folder.
- To paste the file path:
You can use this method if you clicked the Copy Easystub File Path button in the Easystub Upload File window. Make sure that your cursor is in the File name field and then paste the file path by pressing Ctrl-v on your keyboard (hold down the Ctrl key and press the v key). - To manually select the file from a folder:
- Use the controls in the File Upload window to navigate to the correct folder and then select the file to be uploaded.
- Click Open at the bottom of the File Upload window. This will open the specified file and close the File Upload window.
- On the Upload File page, click Submit to upload the file.
- Please do not close or leave the Upload page until a message is displayed that confirms the file has been successfully uploaded.
- To paste the file path:


After you have successfully uploaded the file, your employees will be able to log into their Easystub accounts and access their pay stubs.
Easystub menu options
Upload File
This page is used for uploading files and also displays information on the most recent file that was uploaded.
Edit Company
This page allows you to enter and edit your company and contact information.
Please keep this information up-to-date, especially your contact name, phone and email address.
This page also allows you to upload an optional company logo that will appear at the top of the Easystub pay stubs. The maximum size allowed for the logo image is 160w x 120h pixels. A JPEG file works well and results in a good quality image. For instructions on how to upload a logo, please refer to Easystub’s online help.
Manage Employees
This page displays a list of your employees.
You can search for an employee by Employee ID or Name.
The Edit link beside an employee allows you to reset their password. When you reset a password, the password is set to the last five digits of the employee’s SIN number.
The View Stubs link displays a list of all of the pay stubs in the Easystub system for the selected employee. You can then view or print any of the pay stubs that are listed.
Manage Pay Stubs
This page allows you to view the pay stubs that were included in previously uploaded files.
Click the View link to display a list of all of the pay stubs that were included in a particular file.
If an Easystub file is posted in error, it can be deleted.
Individual pay stubs can also be deleted.
CAUTION: Please use the delete option with caution. Before deleting a pay stub, you may want to print a paper copy. For more information, please refer Easystub’s on-line help.
Manage T4 Slips
This page allows you to view T4 slips that have been uploaded.
For help with Easystub T4 slips, please visit this page: A Quick Guide to Easystub T4 Slips.
Monitor Activity
This is a log of the user activity in the Easystub system. The main purpose of this feature is to keep an audit trail of key activity and potentially detect improper activity.
Fees Report
Easystub fees are calculated when an Easystub file is created in Easypay.
Fees are automatically added as a separate payment to the direct deposit payroll file (under the name "Easystub") and are debited from the employer's bank account during the direct deposit process. Fee details are included in Easypay’s Direct Deposit Register.
The Fees Report in Easystub allows you to print a list of the Easystub fees incurred over a specified time period. For example, you may want to print a monthly or quarterly report for GST/HST input credits.
Help
To access the online help, click the Help link in the top right corner of the Easystub page.
Change Password
If you need to change your User ID or Password, click the Change Password link in the top right corner of the Easystub page. If you forget your password or are unable to log in, please call Easypay Support at (905) 825-8020.
Log Out
When you have completed your Easystub session, please remember to log out. This will help to keep your Easystub account secure.
Easystub T4 slips New
In addition to pay stubs, you can also post T4 slips online.
For help with Easystub T4 slips, please visit this page: A Quick Guide to Easystub T4 Slips.